Despite being someone who has never been a huge fan of Indian food, I’m a total convert to this biriyani. Just sitting here writing up this recipe, my mouth is watering and I’m wondering where I could pick up more fresh beetroot on my travels today. I’m sure the family won’t mind eating the same thing again either!
Cook time is quite long because the beetroot needs to be roasted first, and then rice has to boil, but the hands’ on time is pretty quick, so you have time to be doing other things in between too. Like prepare the sautéed beet greens to have on the side.
It’s a great ‘everyone tuck in meal’ and it turned out to be one of those where the pots were scraped clean!
This is a brilliant recipe – quite possibly my favourite beetroot or biriyani recipe – but if you need more beetroot recipes, click here!
Heat the oven to 200C/180C fan/gas 6. Drizzle oil over the beetroot and sprinkle with salt and pepper. Toss to coat, then tip into a roasting dish and cook for 25-30 mins or until tender.
While the beetroot is cooking, heat the remaining oil in a deep frying pan (or a wok) with a lid.
Fry the onion over a medium heat until golden.
Add the ginger and half the garlic, and cook for 1 min.
Stir through the bay, cardamom seeds, turmeric and garam masala, then cook for 2 mins.
Stir in the rice and beetroot.
Pour in the stock and place a fitting lid on the pot
Boil for 20-25 minutes, keeping an eye on to make sure it doesn't dry out or burn to the bottom of the pan.
Put the remaining garlic in a food processor and whizz, then add the yoghurt till it's well blended. Set aside.
I’ve been struggling with a winter cold for weeks now and while I’m normally an ‘it will pass’ kind of sick person, I’m about at the end of my tether with this particular cold, so it’s definitely time to dig out the big guns – in this case a chicken broth stellette soup.
The chicken in this recipe is already cooked, left over from Sunday lunch and it’s worth mentioning that the ratios of the spring onions, mushrooms, chicken and pasta can vary. It won’t hugely affect the end result, and it’s better than leaving a random mushroom alone in the punnet in the fridge!
Mushrooms are great for colds and flues apparently, containing cytokines that play an important role in defending the body against viral infections and tumours and help boost the immune system. And I’ve read conflicting advice about the consumption of mushrooms, but it seems that in order to get the most nutrition from them, they must be cooked otherwise they’re undigestable.
According to Chinese medicine, spring onion is good for expelling a winter cold, especially if consumed within the first two days of the cold.
Parsley has high levels of Vitamin C, Vitamin B12, and betacarotene that boosts the immune system of the body and protects it from colds, cough, and other infections.
Chicken is rich in a compound called carnosine, and it’s this that studies suggesthelps reduce that stuffy, congested feeling in your nose and throat.
I also like using Stellette or Stelline pasta as they are small and don’t require much chewing and small enough to swallow (great when you have a sore throat) and then they are kind of pretty too!
I might try adding ginger and garlic next time too, not only because of the health benefits but because they might add a little extra flavour kick at a time when you can’t taste much!
Temperatures are dropping and the days are becoming shorter, so for us, it means the slow cooker has come out of the dark depths of the cupboard. We’re trying out a variety of savoury dishes for Halloween, a season not normally known for its savoury foods, but I want to have some options available, at least!
For this recipe, I’ve used yellow peppers. I didn’t realise until I was cleaning them out that one of the peppers only had two humps on the apex, rather than three, which meant it couldn’t stand on its own. Undeterred, I just cut a small layer off, not so much that the bottom of the pepper was opened up – just enough to make it stand up straight.
Cutting faces in a pepper is a whole lot easier than it is on a pumpkin. Simply use a sharp knife and carefully pop the cutout parts out.
You can use any filling you like, really. I’ve used a chicken and tomato one. If you want to stretch this meal, add some rice or couscous to the pepper. Alternatively, serve each pepper on a bed of rice. I didn’t bother in this particular meal.
Once stuffed, I felt the peppers could use a bit of help to stand out a little, so I used a finger to pop some homemade tomato sauce into the eyes and mouths of the peppers.
I love the way the chicken and tomato looks a bit like brains, topping off the Halloween face. It’s simple, and quite effortless and very tasty!
Slow Cooked Chicken and Tomato Stuffed Peppers Recipe
Have you ever seen the Red Tractor symbol when you buy meat and wondered what it’s for? Well, the Red Tractor is a sign signifying that the lamb and beef you’re looking at is Quality Assured. “All beef and lamb carrying the Mark is chosen according to a strict selection process to ensure it is succulent and tender.”
The Quality Standard Mark also tells you where your beef and lamb is from with the St George’s flag indicating meat from an animal born, raised and slaughtered in England or if it is born in Scotland or Wales, it will carry the Union flag.
Red Tractor Beef and Lamb have set us a challenge to create a lamb or beef slow-cooked ‘peasant’ meal that is perfect for busy families.
Here’s what they have to say:
Red Tractor Beef & Lamb has launched a campaign to celebrate the peasant food trend, and inspire families to rediscover traditional cooking techniques, from around the world that are simple, warming and hearty.
With the launch of the #LivePeasant challenge, we want families to reclaim traditional cooking and let the oven or slow cooker do all the work. Using inexpensive cuts of beef and lamb, which are perfect for slow-cooking, dishes can be prepared in advance and left to cook so that delicious, melt-in-the-mouth home-cooked meals are ready and waiting when you are. So take a little time to discover the peasant food trend and enjoy the benefits of a meal with less haste more taste!
I decided on a lamb dish as we don’t often eat lamb, because I always think of lamb as quite expensive, but when I looked at the prices of the slow-cooking lamb shoulder, it worked out at less than £10 for almost 2kg, which seems fairly reasonable – especially since 2kg of lamb is enough for at least 4 meals for our family (1 adult, 2 children).
While I put this meal on in the slowcooker we were able to go about our day – a trip to the park, some grocery shopping, and a quick coffee with friends. Back home, we made rice, and dinner was ready to eat by the time the kids were in their pyjamas. That’s really the beauty of slow cooked meals. Not only can you use cheaper cuts of meat than you normally might, but they require very little effort. If you have reluctant veggie eaters you can also do a puree of veggies to add to the stock, but I didn’t do that this time (we are moving house this week, so we’ve stopped the veggie box delivery!)
For this challenge we had to make something along the theme of ‘peasant food’, which Google describes as dishes specific to a particular culture, made from accessible and inexpensive ingredients, and usually prepared and spiced to make them more palatable. This recipe turned out amazingly well. I actually think it’s one of the most flavourful dishes I’ve made to date, so that part of the brief was achieved, no doubt!
To make this meal you will need:
2kg shoulder of lamb
dash of olive oil
1 onion
500ml stock
20ml (1 tablespoon) Nam Pla (fish sauce)
1 orange (optional)
salt and pepper
fresh rosemary and thyme – two sprigs each, roughly
2 tbs (about 40ml) corn starch/corn flour
200g chestnut mushroom (or your preferred mushrooms)
You can add as many other seasonal vegetables as you like, really, including potato, courgette or pumpkin, but if I add visible vegetables my youngest won’t eat it, so I generally just steam them and add them on the side. It’ll be hard to get it ‘wrong’ though, so play around with it!
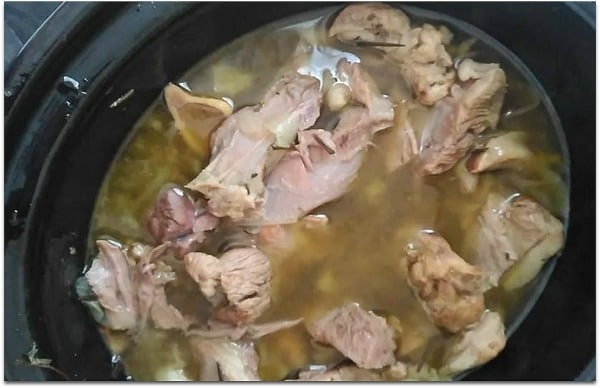
Firstly, heat a frying pan and drizzle a little oil. Place the meat in the pan and cook for about two minutes on each side.
Meanwhile, slice onion and place in the crockpot or slowcooker.
Move the meat and any resulting juices into the slowcooker.
Make up 500ml stock, then add the juice of one orange, Nam Pla and salt and pepper to your taste. Pour over the meat. Place the lid on, and set on high for 3 – 4 hours (or low for 6 – 8 hours, depending on your slowcooker), and top with the sprigs of herbs. Nam Pla is a fish sauce but it just does something special to meat. If you’ve never tried it, you really should. It brings out the flavour in the most fantastic way.
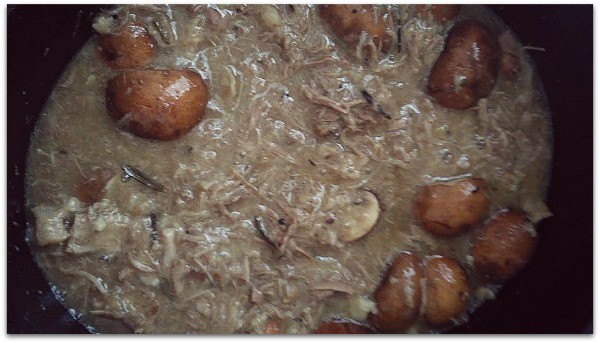
After this time the meat should be falling off the bones, if there are any. Just scoop out the bones, and using a slotted spoon remove the meat.
In a separate bowl, add the corn flour, then add a tablespoon of the stock to form a paste, then another two or three tablespoons of stock to make it runny and pour it into the crockpot, on high, and leave it for another hour, adding the chopped mushroom at this point, and make sure to leave the lid off (if you don’t have an hour, pour the paste with the rest of the stock into a stove top pot on low heat and stir until thickened.)
While the gravy is thickening, either roughly chop or shred the lamb – you can do it easily in a food processor on low speed, the meat should be tender enough to just come apart.
Mix the meat back in with the gravy and cook the rice.
Serve topped with fresh herbs, salt and pepper.
Shredded Slowcooked Lamb And Mushroom #LivePeasant
fresh rosemary and thyme - two sprigs each, roughly
2 tbs (about 40ml) corn starch/corn flour
200g chestnut mushroom (or your preferred mushrooms)
Instructions
Heat a frying pan, and drizzle some olive oil
Add the lamb and fry for about 2 minutes on each side to brown
In the meantime, thinly slice the onions and prepare the stock
You can use a prepared stock, or stock cube, or a home made one, whichever you prefer, but make it up to 500ml, then add the juice of an orange, the Nam Plah and salt and pepper to taste
Move the onions and meat into the slowcooker or crock pot, pour over the prepared stock, and add the chopped herbs
Cook on high for 4 hours
Remove the meat - at this point it should be falling off the bones, if there are any
In a separate bowl, mix the corn flour with a tablespoon of the stock to form a paste, then another two or three tablespoons of stock to make it runny, then pour it into the crockpot, still on high, and leave it for another hour, adding the mushrooms at this point, and make sure to leave the lid off (alternatively make a gravy in the way you 'normally' would.)
While the gravy is thickening, shred the meat with a fork, or in a food processor on low speed normally works well too, then add it back into the crockpot till you reach the right level of sauciness.
3.5.3208
If you have any left overs you can use them in wraps too. I chopped some locally grown tomatoes and lettuce for our day after lamb, wrapped them in flatbreads and had a fresh, crunchy and perfectly summery lunch.
Growing up in South Africa, I took for granted that meat was meat. We seemed to always have good meat, when we had meat. Moving to England we found the quality of the meat… less than satisfactory. We’d often have a good meal – even in a restaurant – and comment that the meat was the weakest component of the meal.
It was only a few years later when I got our first organic meat box that I remembered what good meat tastes like – and more recently was introduced to Welsh Lamb and Welsh Beef, and it’s restored my faith in the yumness of meat.
To create this recipe we were sent a huge piece of Welsh Silverside Beef – probably the biggest I have ever cooked at one time and rather than roasting it, I wanted to do something to make it stretch over a few meals , so I seared the beef, and chopped it into cubes. This may sound like a waste of a perfect piece of meat, but it wasn’t. It was so worth it.
After mixing a few sauces and stock together – see the recipe – I left the meat to slow cook for 6 hours before adding mixed root vegetable.
We ate one round of this delicious Welsh Beef Hotpot immediately, and froze two more meals (two meals of three serves). The smaller portion was mixed with risotto rice to make a deliciously flavoured risotto, and the larger portion was put inside a giant Yorkshire pudding which makes a fantastic meal.
Add oil to a frying pan, along with the onion and sear each side of the meat about 2 - 3 minutes per side. Chop a mixture of root veg into chunks
Move it into a slowcooker
In a different dish, stir together the red wine, soy sauce, sugar and stock and pour over the meat.
Add the vegetables and cook on low heat for 6 hours
Before serving, pour the stock into a saucepan. Put two tablespoons of corn flour and 4 tablespoons of stock together in a bowl and mix it together to make a paste. Add more tablespoons of stock till it forms a runny liquid and there are no lumps then pour it into the saucepan with the rest of the stock. Leave for about 10 minutes till it thickens up then add the meat back in
Serve with rice, Yorkshire puddings or other sweet breads
Through all the milestones of life – birth, breastfeeding, parenting choices, weight management, relationship rise and decline – I try to remain non-judgemental and realise that everyone has their own path to walk, but every year, around this time (early February) my inner judge and jury come out in full force when I walk through the supermarkets and see ‘pancake mix’ sold in single use plastic bottles.
I’m sorry. I really am. I can’t put my judgemental face away right now.
Our local supermarket has a huge display of pancake mix today. It’s £1 for a bottle that makes 6 pancakes. SIX.
The ingredients are: Wheat Flour, Sugar, Palm Oil, Whey Powder (Milk), Dextrose, Dried Egg Yolk, Salt, and you’ll need to add oil for cooking.
Yay for the unnecessary deforestation. Not to mention the plastic that ends up in landfill.
(See, I told you this makes me all judgey! )
If you were to, oh, I don’t know, make your own pancake mix your ingredients would be flour, eggs, milk, salt and a bit of oil. Then you mix it together. My three year old can do it!
And to make six pancakes? Your ingredients – assuming you don’t go for caged hen eggs or the cheapest possible flour – will cost you the grand sum total of 27p. A little over 1/4 the cost of those ‘convenient’ little bottles. If you’re going all out luxury and putting two eggs in the batter, you’re still looking at 35p for six pancakes.
The only time I can imagine justifying buying pancake mix is if you’re hiking, carrying your week’s food with you and you wanted to make pancakes one morning, on an open fire, high up in the mountains. And even then I’m not convinced.
Okay. I’m going to step off my pedestal and give you the pancake recipe I’ve been making since I was a child, since my mom took us high up into the mountains (by car) to make pancakes on a camping stove in the snow.
Some pancake recipes call for one egg, some for two. I like doing two with savoury pancakes as it makes them a bit thicker, and sturdier, and better for holding something like ham and cheese or chicken mayo. One egg is fine for holding sugar and cinnamon or chocolate spread or similar light fillings. Or, hmmm… bananas, cream and caramel.
The recipe below is for 6 pancakes which is generally enough for the three of us. You can double or triple or x100 it without much effort – just increase the mixing time.
If you’re not sure how to cook a pancake, the best way of learning is seeing, so have a look at these youtube videos!
300 or 280g milk (depending on how many eggs you use)
10g (1tbs) vegetable oil
a pinch of salt
Fillings
Cinnamon, sugar and lemon juice to taste
Instructions
Add all the ingredients into a bowl and whisk. It's easier if you use a whisk or an electric beater, but even a fork will do it eventually. Mix till it's all combined and you have a runny, smooth, lump free batter.
If you're using a Thermomix®, mix for 10 seconds/speed 5
Turn the stove up to a medium high heat, and pour into a frying pan enough batter to cover the base. I use a standard sized soup ladle, about half full for each pancake.
Let it fry for a minute or so, till the edges start to brown, then use a spatula or flip over and cook the other side for about 30 seconds
Tip the pancake onto a plate and sprinkle cinnamon, sugar and lemon juice over
Repeat till you've used up all the batter
TIPS:
Having added oil to the batter, you shouldn't have to add any to the pan, but pans differ, so if the batter sticks add a dash of oil.
I use brown sugar because I prefer it, but it's also really nice with castor sugar
If you really don't know how to cook pancakes, there are hundreds of videos on youtube that can help you.
When Easiyo got in touch to ask if I’d like to review the yoghurt maker I declined, since, well I have one already! But when they invited me to an event I had to oblige – I’m a sucker for a good event! – and boy was I surprised! The new Easiyo is totally different to the old one!
How is the new Easiyo different to the old Easiyo?
There are plenty differences. The first is in appearance.
The new Easiyo is slicker, and will fit right into the modern kitchen
It’s a lovely red, with rounded edges. It looks very stylish.
The new Easiyo is shorter and will fit on at least one of the shelves in kitchen*
The old Easiyo was really tall and didn’t fit on any of the shelves in my kitchen, so I stored it on top of the boiler, which isn’t the ideal spot to store anything, really. It was a bit ‘clutter’-ish. This new one is shorter, and fits nicely on the shelf when not in use.
*Unless you have a really off-speck kitchen
The new Easiyo has sticky feet underneath
This is great as it’s less likely to move around the counter and crash onto the f loor when your washing machine is on the spin cycle!
The new Easiyo is filled with New Zealand Lambs Wool
Inside the Easiyo, between the red external and white internal walls is a square of New Zealand lambs wool, rather than the polystyrene that used to fill the old version. Apparently this makes for better insulation, but I’m pretty sure it’s better for the environment too, should the time come to recycle.
There’s an Easiyo mini maker too
I think this is a great addition for smaller families or individuals. It’s a 500g maker in green and does the same thing, but in half the quantity.
So what’s the same then?
You still get the freeze dried milk starters that you can use to make your yoghurt. It still takes about 30 seconds to make the yoghurt, which you then set aside for 8 – 12 hours depending how thick you want your yoghurt, and then chill and enjoy.
There are 35 flavours of starter, and contrary to what you might think of something that comes out of a bag, there’s no preservatives, no added sugars and there’s still a live acidophilus culture in each bag. So it’s really all good stuff. The plain yoghurt will last for two weeks in the fridge, those with ‘bits’ in them for about a week. If your family is anything like mine, however, it won’t last more than a couple of days.
Of course you can use the yoghurt in a variety of other recipes too, and at £2 a kg of yoghurt it’s cheaper than other luxury brands, even if not as cheap as the cheapest brands – (but if you use some of the current batch to make your next batch, it costs you the price of milk. Then just make up a new batch from the powder when you need it/have run out and so on.) But the pouches are really convenient and fantastic for when you are short on time. Over the next few weeks I’ll be trailing some of the flavours and will let you know what I think of them!
Well, that’s a mouth full, isn’t it? And for those who don’t know, don’t worry – no bunnies are harmed in the making of this South African Lamb Bunny Chow curry. Why it’s called a bunnychow I couldn’t tell you, but since it’s #NationaCurryWeek, I wanted to share a delicious curry recipe with you, made with succulent, tender Welsh lamb.
When I decided I was going to make a bunny chow for my #NationalCurryWeek contribution, I Googled Bunny chow recipes, and one of the first that came to my attention was this one, from my countryman Jeanne from Cooksister, on whose blog you can also read all about the origins and intricacies of this street food dish, while Lavender & Lovage has a different origin story with her chicken bunny recipe here.
One thing I know for sure about curries is that everyone’s tastes differ, even within our own family, so I’ve made a few adaptations, and Thermified the recipe too.
I would definitely recommend that you start this dish off by making your own Garam Masala. I think a fresh batch makes all the difference. Adjust the curry depending on how hot you like it – I feed two small children, so we don’t make it hot at all. You can even add chillies.
Traditionally you would use a square unsliced bread for the ‘bowl’, but we use whatever bread we have. In the photos we’ve used French bread sticks for smaller meals, and individual giant rolls for bigger meals. I don’t think the bread matters too much, in reality.
If memory serves, you can make a bunny with chicken, lamb, pork or rabbit, as well as beans or root vegetables.
The amount of curry you use in this will depend on how hot you like it. I feed two small children so we only add just about a teaspoon, but you can add more or less. My dad also adds chillies from his garden.
Author: Luschka
Recipe type: Curry
Cuisine: South African, Street Food
Serves: 4 servings
Ingredients
10g ginger
10g garlic
1 medium onion
15g vegetable oil
5 - 20g curry powder, depending on how hot you like it
1 stick cinnamon
4 green cardamom pods, seeded
5g ground turmeric
200g water
1x400g tin chopped tomatoes
3-4 potatoes (1 per person, basically)
1kg lamb, cubed
15g Garam Masala
Salt
a small loaf of bread per 2 people
Fresh coriander
Instructions
Lightly brown lamb on the hob if you like
Dice the lamb and the potatoes
Add garlic and ginger to the Thermomix® bowl 10 seconds/ speed 5
Add onion 5 seconds/speed 4
Add 15g vegetable oil and sauté 3 mins/90C/speed 2
Add the curry powder, cinnamon, cardamom pods, and turmeric and saute for a further 1 min/90C/speed 2
Add tomato, water and potatoes and cook for 20 mins/Varoma/REVERSE speed 2
Add lamb and garam masala and cook for a further 10 mins/100C/ REVERSE speed 2
While the curry is cooking, cut the bread in half, and scoop out the soft centre
Butter it if you want to - this is contestable, some of our family swear by it, some say it's sacrilege
When the curry is cooked, taste and season if required
Scoop the curry into the hollowed out bread, scatter fresh coriander, and replace the bread on top
Serve while still warm
3.2.2925
The Welsh Lamb in this Lamb Bunny Chow was provided to me as part of a promotion to promote Welsh Lamb
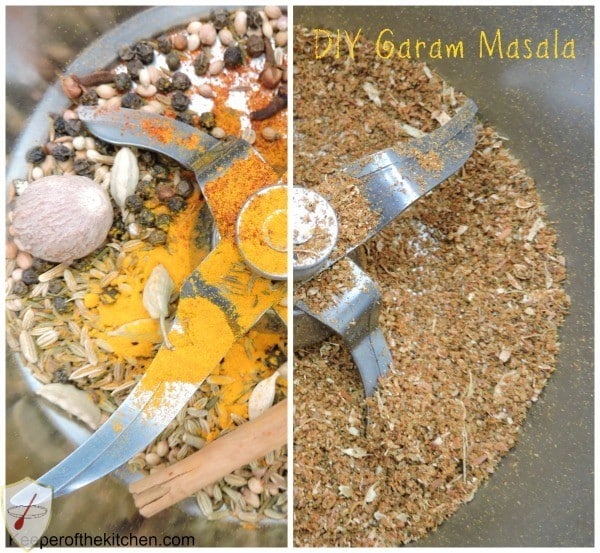
For Garam Masala, I’ve discovered, there are about as many recipes as their are people making it. There isn’t one authentic, or one original recipe, but rather it seems to be a matter of personal choice.
For a long time I would say that I didn’t like curries. I think this was because every curry I ever had from a takeaway was just an overkill of hot and I didn’t find that very pleasant. It was only when a friend served me a curry she made that I realised that there was a world of flavour out there that I knew very little about. Over the recent years I’ve learned to enjoy curries – but only those I make, so that I manage the heat!
Garam Masala is the foundation for many North Indian and South Asian dishes, but I’ve also learned that it can add amazing flavour to any meat dish without specifically making it a curry. Garam Masala actually means ‘warm spices’ and that’s precisely what these spices do – they add a warm depth of flavour to the meal.
As with all spices, if you’re able to blend it fresh when you need it, the flavours are stronger and richer, but I make a small amount at a time so that I make a fresh batch every month or so. You can freeze this and take it out as you need it, or just store in an airtight container.
Since I prefer to make this mix up fresh as often as possible, I keep the quantities small, meaning the Thermomix® scales aren't useful here, so this recipe uses a 5ml teaspoon and a 15ml tablespoon.
Author: Luschka
Recipe type: Seasoning, Spicemix
Cuisine: Asian, Indian
Serves: 200g
Ingredients
1 Whole nutmeg
10 Whole cloves
1 Cassia Stick (sold as cinnamon sticks in supermarkets)
1 tsp Black Peppercorns
2 tbs Coriander seeds
1 tbs Cumin seeds
1 tbs Fennel seeds
1 tbs Cardamom pods (about 6 pods)
1 tsp Cayenne pepper (add more if you prefer a hotter spice, or substitute for dried chillies)
1 tsp Turmeric
Instructions
If you're using a Thermomix®, you can add all the ingredients to the bowl and whizz at speed 10 / 20 seconds. Check inside to confirm, but everything should be a fine powder.
If you're not using a Thermomix® or similar high powered blender, add the first four ingredients, and blend for 30 seconds or until broken into pieces. Add the rest of the ingredients and blend for a further 30 - 60 seconds depending on your blender, until all the spices are crushed.
Store in an airtight container and use within a month for the best flavours.


 Have you ever seen the Red Tractor symbol when you buy meat and wondered what it’s for? Well, the Red Tractor is a sign signifying that the lamb and beef you’re looking at is Quality Assured. “All beef and lamb carrying the Mark is chosen according to a strict selection process to ensure it is succulent and tender.”