Bear Claws Snacks For Autumn

Bear Claws

I do love ‘happy post’ – that’s what we call mail the postman has to ring the bell for!  A few weeks ago we received this fab parcel from BEAR, containing their Halloween/Autumn themed bear claw snacks.
Bear Claws

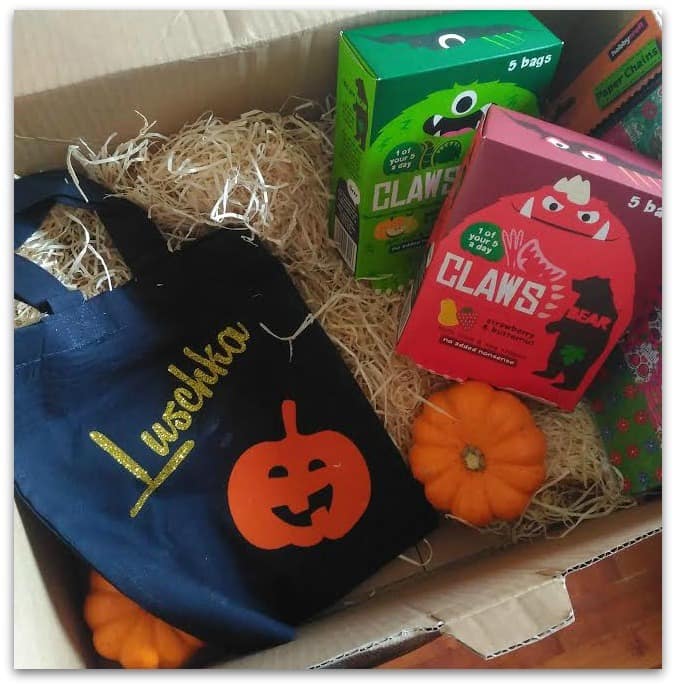
I loved the personalised bag that comes as a perk of working with Bear, and did immediately pop the little squashes into the oven, then demolished them with slatherings of butter. And I didn’t even share! 😉

For the kids, the box contained Strawberry and Butternut BEAR Claws and Apple, Pear and Pumpkin BEAR Claws.

Each box contains 5 lunch box sized bags – convenient, since I have two kids, so they can have a two bags each and there’s a spare for me!

As with all BEAR snacks, these flavouris are 100% fruit and veg and contain no ‘added nonsense’. Bear Claws

The flavours sound rather… unusual… and I wasn’t sure what to make of them, but after playing with my food for a while, I did try them.

When you open the Strawberry and Butternut package you’re immediately met by the sweet aroma of the strawberry. Pop one in your mouth, and the overwhelming flavour is of strawberry. I struggle to identify the pumpkin flavour in these at all, but from a child’s point of view, I don’t think that’s a bad thing. Apparently there’s 230g butternut in a finished (dehydrated) 100g of BEAR Claws, so if a bag is roughly 20% of that  – each bag contains roughly 45g of butternut (I’m guessing) – so it’s an ideal way to get those hidden veggies in!

bear-3

The Apple, Pear and Pumpkin flavour on opening has a sweet apple aroma, and while it has distinct pear and apple flavours, you again can’t really taste the pumpkin despite the presence of over 240g of pumpkin to each 100g of finished product.  Bear Claws

While the BEAR claws are great to play with, they are also delicious to eat, and my kids love them. In fact, it’s getting them to save some for later that’s the problem!

Bear Claws are available online from Amazon and Ocado though you can pick them up in shops like Waitrose too.

We were sent this box of goodies free to review as part of the BEAR ambassador programme. Opinions and views are my own (or those of my children.) Links in the post may be affiliate links – you will not be charged for using them. 

Snackeez Snack And Drink Cup

Snackeez

Snackeez is a new product on the market – a snack pot and drink cup in one. It’s the kind of thing I can imagine was dreamt up at a cocktail party, when someone was holding their champagne glass and serviette of finger foods in one hand, while shaking hands and hobnobbing with their free hand.

I don’t think Snackeez will be taking over from Champagne flutes at posh events, but I do think it’s a super useful product for busy parents and active people. Snackeez

The Snackeez Snack pot is a three-part construction: the standard reusable drinks pot, that you fill up to the top of the cupholder, with a pot that fits inside. It has a flip top lid and a movable and removable straw – ideal for washing up.

The pot fits inside the cup, screwing tightly in so that there (doesn’t appear to be!) any leakage, unless you tip it upside down and liquid gets in the straw.

While the snack pot looks quite small from the outside, it holds a substantial amount of snackage. As you can see in the picture I had a fair portion of grapes and a whole clementine in there, and there’s plenty of room to spare.

When would you use the Snackeez Snack and Drink Cup?

I use mine when I’m leaving the gym. I go to the gym after dropping my children in the morning, so they’ve been up, gotten dressed, had breakfast and we’ve driven a half hour to anywhere, then I go to the gym and aside from coffee and maybe a small snack, I’ve not eaten anything yet. I finish in the gym around 10:30 or 11, and by that time I can be light headed and starving. It’s really hard then, to walk past the cafe (who decided it was a good idea to sell cakes in the gym? Is that their way of making sure you come back?!) and not buy something.

Now, I keep the Snackeez pot in the car with fresh water or smoothie and some nuts or other fruit in the snack pot.

The flip top lid makes it easy to get the fruit out while I’m driving, since I don’t have to take both hands off the wheel to open it.

My children also like using it for their pretend picnics – I guess it’s the novelty factor, but it means they’re drinking water and enjoying healthy snacks.

I think this would also be super useful if you were one handedly pushing a stroller or pushchair, and still wanted a hand free for a drink and snack.
Snackeez

What don’t we like about the Snackeez Snack and Drink Pot?

I love the flip top lid when I’m driving, but it does mean I can’t put the cup in my handbag and you can’t put it in the kids’ lunch box, because it doesn’t seal. If they could find a way to make it sealable, it would be superb for an on-the-go lunch idea.

It’s not suitable for hot drinks, so I can’t put coffee in it. I have a problem with anything I can’t put coffee in!

It’ll be good come summer though – iced coffees are so refreshing!

Where can you find the Snackeez Snack Pot and Drinks Cup?

There are a variety of distributors for Snackeez cups  – you can buy through Amazon, Argos, eBay or Character Online at the moment (£9.99) and they come in a range of colours too.

See Snackeez in action!

[youtube GnapQw0kC60]

Dinosaur Eggs (or Easter Eggs)

Dinosaur Easter Eggs
Marbled Easter Eggs

My children love having dinosaur eggs (or dragon eggs)  for lunch, but these can make really pretty Easter eggs too – ideal for lunch boxes or breakfast around Easter, and they couldn’t be easier to make.Dinosaur Eggs Easter Eggs Boil eggs in whichever way you prefer.

I fill the Thermomix® bowl to half way through the internal steamer basket, place the eggs inside, then boil at Varoma temp for 14 minutes (9-11 should do it for soft boiled, if you start with cold water, but for these I prefer hard boiled).

In the meantime, mix a few drops of food colouring in a few tablespoons of water. If you use commercial food colouring you may need more colour, if you use confectioners grade, you need just one or two.Dinosaur Eggs Easter Eggs

Once the eggs are boiled, run cold water over them so that they are touchable, then very gently crack the shell all the way around. Don’t crack it too hard, you don’t want the shell to come off yet.Dinosaur Easter Eggs

Roll the egg in the food colouring till it is well coated, then leave for 5-10 minutes.Dinosaur Eggs Easter Eggs

Very gently peel the shell off. If you peel the membrane off, most of the dark colouring will come off too, but if you’ve left it long enough, it should be fine. It’s just easier to peel if you get hold of the thin membrane and pull the shell off.

Dinosaur Eggs Easter Eggs

You should be left with a colourful cracked egg.

Nutella Banana Muffin Recipe

Nutella Banana Cupcakes

It’s nutella and banana. Do you need any more convincing? I have a banana bread recipe that I love and use often, but sometime a little something different doesn’t hurt!

Nutella Banana Cupcakes

I would recommend using deeper muffin pans than the ones I used for these, as being able to cover the nutella completely is a bit more ideal, but it’s not the end of the world if you don’t.

Leaving the chocolate exposed will give it a crunch top layer, covering it will give you more oozy, yummy chocolatey goodness.

Nutella Banana Muffins
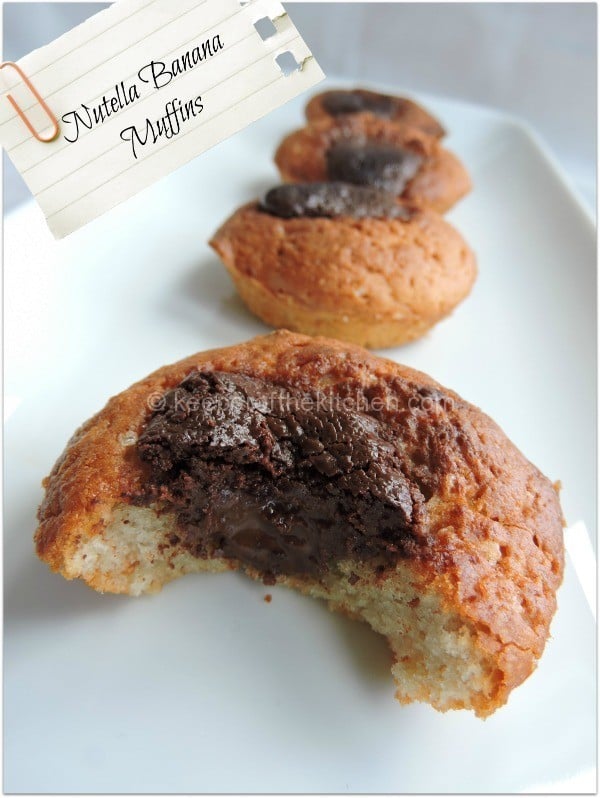
Now, I’m saying use Nutella here, because it’s a name most people recognise, but you can of course substitute for other chocolate spread, including a home made one. 

These are really delicious, moist and tasty. I hope you enjoy them too!

Nutella Banana Muffin
 
Prep time
Cook time
Total time
 
Adjust the Nutella, or home made Nutella, for more or less chocolatey centres.
Author:
Recipe type: Treats, Snacks, Deserts
Serves: 12
Ingredients
  • 180g self raising flour
  • ½ teaspoon cinnamon
  • 100g sugar
  • 80g oil (not olive)
  • 2 eggs
  • 2 bananas
  • 100g milk
  • 120g Nutella
Instructions
  1. Preheat oven to 180C
  2. Prepare your muffin pans
  3. Add all the ingredients except Nutella and mix at speed 5 for 10 - 15 seconds to make sure it's all blended.
  4. Spoon into muffin cases, and drop a little less than a full tablespoon of Nutella into each muffin case.
  5. Bake for 30 minutes to 45 mins, sticking a skewer in every 10 minutes after 20 minutes till it comes out clean.The size of your muffin tray is going to determine how long these takes, hence the variable time.
  6. Remove from muffin trays onto a wire rack, and leave to cool.


Quick And Easy Healthier Carrot Cake

A few years ago I made the perfect carrot cake. I don’t know what recipe I used and have never found it again, but I suspect if I did I wouldn’t use it anymore anyway – it probably had too much sugar and white flour in it anyway.

Carrot CakeI’m still in search of the new ‘perfect’ carrot cake, but these come up a really good alternative, in the meantime.

They last two or so days in a lunch box, and make a great school snack, largely because they’re ‘cake’ without being ‘cake’. We also make them without frosting to make them that little bit healthier, but really, I don’t think it needs anything more anyway.

If you don’t have Rapadura*, you can substitute for brown sugar, but Rapadura is a healthier alternative. I have linked you to the brand we use. Same for the coconut oil.

Possibly one of my favourite things about this carrot cake is that it is so quick and easy to make – no faffing required, and it is really tasty.

 
Prep time
Cook time
Total time
 
I make these in a brownie pan, and don't add any frosting to them at all. You could mix cream cheese and icing sugar to frost, but we like them just like this. They make lovely lunch box snacks. You can add nuts if you wish - just adjust the amount of raisins.
Author:
Recipe type: Cake, Snack
Serves: 18
Ingredients
  • 2 cups carrots (roughly four or five medium sized carrots)
  • 140g raisins
  • 125ml coconut oil
  • 115g plain wholemeal flour
  • 115g self-raising flour
  • 1 tsp baking powder
  • 1 tsp bicarbonate of soda
  • 1 rounded tsp ground cinnamon
  • 100g rapadura (or brown sugar)
  • 2 eggs
Instructions
  1. Heat oven to 160C/320F
  2. Grate carrots finely
  3. Add the rest of the ingredients in the order listed
  4. Mix together till it's all incorporated, but work quickly before the baking powder and bicarb go 'flat'
  5. Scoop into muffin or brownie trays/cake tins
  6. Cook for 20 minutes in cake tin/brownie pan but about 12 - 15 in muffin tins.
  7. Check by sticking a skewer in the middle. If It comes out clean, they are ready.
  8. If you're using a Thermomix®:
  9. Chop the carrots on Turbo for 3-4 seconds
  10. Add ingredients in order listed
  11. Mix on reverse speed for 30 seconds,
  12. Knead for 1 min on closed lid setting
  13. Scoop into muffin or brownie trays/cake tins
  14. Cook for 20 minutes in cake tin/brownie pan but about 12 - 15 in muffin tins.
  15. Check by sticking a skewer in the middle. If It comes out clean, they are ready.