Category: Allotment
-
Filed under Allotment, Dairy, Eggs, Free From, Freezer Food, Gluten, Make Ahead Recipes, Preserving, Seasonal Cooking, Spring, Sugar, Summer, Thermomix Recipes, Vegan, Vegetarian
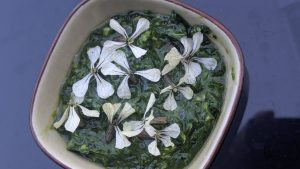
In some bizarre twist of nature, my rocket patch not only overwintered and sprang back to life, but in the warmer spring days and longer light, burst forth into large leaves and flowers this Easter. I decided to try a version of Chimichurri using some of the larger leaves to go on our braai (BBQ) …
Continue reading
Permanent link to this article: https://www.keeperofthekitchen.com/2026/04/12/rocket-chimichurri-arugula-chimichurri/
-
Filed under Allotment, Asian, Autumn, Budget Savers, Camp Food, Cuisine, Dairy, Eggs, Mains, One Pot Meal, Seasonal Cooking, Sugar, Vegetarian

Despite being someone who has never been a huge fan of Indian food, I’m a total convert to this biriyani. Just sitting here writing up this recipe, my mouth is watering and I’m wondering where I could pick up more fresh beetroot on my travels today. I’m sure the family won’t mind eating the same …
Continue reading
Permanent link to this article: https://www.keeperofthekitchen.com/2022/09/19/brilliant-beetroot-biriyani/

Beetroot rosettes are pretty to look at and fantastic to taste. The flavours of goats cheese and red onion blend perfectly to make something that feels like cafe food, but is pretty quick and simple. If you’re doing it as a starter there’s plenty of time to be prepping your main in between. It’s simple, …
Continue reading
Permanent link to this article: https://www.keeperofthekitchen.com/2022/09/19/beetroot-red-onion-goats-cheese-rosettes/
-
Filed under Allotment, Bakery, Condiments, Dairy, Eggs, Food as Gifts, Food Gifts, Foraged Food, Free From, Gluten, Search by Ingredient, Search by Ingredients, Seasonal Cooking, Spring, Summer, Sweets, Thermomix Recipes, Vegan, Vegetarian

Lavender Sugar is one of those things I’ve always looked at and loved the idea of, but never really known what to do with. I’ve always liked crystallised lavender – it’s both pretty and tasty – but aside from medicinal or household use, I’ve never really known how to actually use lavender in food. Partly …
Continue reading
Permanent link to this article: https://www.keeperofthekitchen.com/2017/06/15/home-made-lavender-sugar-recipe/
-
Filed under Allotment, Dairy, Drinks, Eggs, Free From, Freezer Food, Gluten, Seasonal Cooking, Spring, Summer, Uncategorized

The weather is hot hot hot and there’s more of it to come – and there’s just a little bit of rhubarb season left, so still enough time to make this quick and very refreshing drink. It was from a Rhubarb Iced Tea recipe, but since I don’t have much affinity for tea, I changed …
Continue reading
Permanent link to this article: https://www.keeperofthekitchen.com/2016/07/18/rhubarb-lemonade/

An odd side effect of growing your own food is that sometimes you have very small amounts of produce. For example, we harvested a handful of carrots this week, thinning out space for the other carrots to grow bigger. This gave us about 8 small carrots which is barely a snack of one person, never …
Continue reading
Permanent link to this article: https://www.keeperofthekitchen.com/2016/07/01/carrot-cheddar-shortbread-recipe/

I honestly wasn’t expecting a huge harvest from our allotment this month. We only started planting two months ago, and the weather hasn’t been great. And despite a huge amount of work, it being our first season in this new plot… well, I wasn’t overly hopeful. But, as it turns out, the ground is fertile, …
Continue reading
Permanent link to this article: https://www.keeperofthekitchen.com/2016/07/01/grow-harvest-june/
")


