Category: Make Ahead Recipes
-
Filed under Allotment, Dairy, Eggs, Free From, Freezer Food, Gluten, Make Ahead Recipes, Preserving, Seasonal Cooking, Spring, Sugar, Summer, Thermomix Recipes, Vegan, Vegetarian
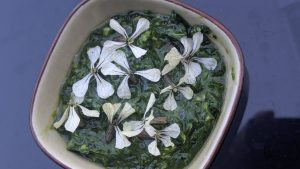
In some bizarre twist of nature, my rocket patch not only overwintered and sprang back to life, but in the warmer spring days and longer light, burst forth into large leaves and flowers this Easter. I decided to try a version of Chimichurri using some of the larger leaves to go on our braai (BBQ) …
Continue reading
Permanent link to this article: https://www.keeperofthekitchen.com/2026/04/12/rocket-chimichurri-arugula-chimichurri/
-
Filed under Dairy, Eggs, Food as Gifts, Food Gifts, Foraged Food, Foraged Foods, Free From, Gluten, Make Ahead Recipes, Preserving, Seasonal Cooking, Spring

We aren’t huge bread eaters in our family, which is a shame since I love making jam. I was looking at some leftover magnolia flowers and wondered whether you could use them the same way as roses to make a jam, and the answer is yes! You can make a beautiful magnolia flower jam from …
Continue reading
Permanent link to this article: https://www.keeperofthekitchen.com/2025/04/04/magnolia-flower-jam-magnolia-flower-jelly/

Magonolia flowers are firm favourites in our house and when my daughter turns up with pockets full of magnolia flowers, I know spring has truly sprung. We use them for magnolia pickles, magnolia cakes and to dip in chocolate. The trees we have access to all have a distinct ginger-flavour, and sometimes we’ll find the …
Continue reading
Permanent link to this article: https://www.keeperofthekitchen.com/2025/03/22/crystallised-magnolia-flowers/
-
Filed under Dairy, Eggs, Foraged Food, Foraged Foods, Free From, Gluten, Make Ahead Recipes, Party Food, Preserving, Seasonal Cooking, Snacks, Spring, Sweets, Vegan, Vegetarian

I love Alexanders – smyrnium olusatrum. They are one of my favourite spring foragables. Driving around the countryside here on the Isle of Wight they suddenly pop up, lining the streets of parts of the Island from early March. We use the thin stems for a sautéed snack or side, the thicker stems for candying, …
Continue reading
Permanent link to this article: https://www.keeperofthekitchen.com/2023/04/24/candied-alexander-stems/

Beetroot rosettes are pretty to look at and fantastic to taste. The flavours of goats cheese and red onion blend perfectly to make something that feels like cafe food, but is pretty quick and simple. If you’re doing it as a starter there’s plenty of time to be prepping your main in between. It’s simple, …
Continue reading
Permanent link to this article: https://www.keeperofthekitchen.com/2022/09/19/beetroot-red-onion-goats-cheese-rosettes/
-
Filed under Cuisine, Dairy, Eggs, Food as Gifts, Food Gifts, Foraged Food, Free From, Gluten, Make Ahead Recipes, Party Food, Preserving, South African, Summer, Vegan, Vegetarian
I’m always really excited when I find a fig tree – like something in me forgets that I live in England now, and I’ve yet to pick a ripe fig from a tree – even here in the very South of England. Fortunately a South African friend of mine invited me round to her house …
Continue reading
Permanent link to this article: https://www.keeperofthekitchen.com/2022/06/05/green-fig-preserve/
-
Filed under Autumn, Cuisine, Eggs, European, Free From, Freezer Food, Gluten, Keto, Mains, Make Ahead Recipes, One Pot Meal, Seasonal Cooking, Sugar, Thermomix Recipes, Winter
Permanent link to this article: https://www.keeperofthekitchen.com/2020/09/03/creamy-garlic-chicken-with-sundried-tomatoes-and-spinach-pan/
-
Filed under Dairy, Eggs, Food as Gifts, Food Gifts, Foraged Food, Gluten, Make Ahead Recipes, Seasonal Cooking, Spring, Vegan, Vegetarian
Permanent link to this article: https://www.keeperofthekitchen.com/2020/06/23/foraged-hawthorn-blossom-vodka/
-
Filed under Dairy, Eggs, Food as Gifts, Food Gifts, Free From, Gluten, Make Ahead Recipes, Sugar, Thermomix Recipes, Vegan, Vegetarian
Over the summer our local supermarket was selling off a bunch of live chilli plants, and even though I really don’t like chilli – except in hot chocolate – I love the splashes of red against the deep green leaves and I love the brightness it introduces to my kitchen. The plant itself is one …
Continue reading
Permanent link to this article: https://www.keeperofthekitchen.com/2017/12/03/diy-chilli-salt-edible-gifting/
-
Filed under Asian, Condiments, Cuisine, Dairy, Eggs, Foraged Food, Free From, Freezer Food, Gluten, Make Ahead Recipes, Seasonal Cooking, Sugar, Summer, Thermomix Recipes, Vegan, Vegetarian
Permanent link to this article: https://www.keeperofthekitchen.com/2017/07/27/savoury-chinese-plum-sauce-recipe/
Load more
")


